Showing posts with label diy. Show all posts

Wednesday, March 18, 2015

DIY Decoden Phone Case

I know that I'm a grown adult and I probably shouldn't be doing ridiculous things like carrying around a cell phone that looks like someone barfed up candy onto it, but at this point I don't care. It's just way. too. cute. Back in the days of flip phones I used to hang adorable Japanese charms and super glue Swarovski crystals all over my phone, so nothing has really changed. I am, so my husband says, a 7 year old stuck in a 29 year old's body.

Since the iPhone came out I was a little sad that I couldn't put charms on it and make it cute. Most of the cases were just "eh." The most I saw was those little dust caps that go into the headphone jack and have charms attached to it. It's a pretty good idea but I needed more. Then I stumbled upon decoden! It was just as ridiculously cute as I needed it to be.

"Decoden" is a craft where people adhere cute little charms called "cabochons" to things using a silicon cream. The cream can be bought in different colors and many people just use caulking from the hardware store. You pipe it on the item you are decorating with an icing bag and icing tip to make it look like cake icing or whipped cream. Then you place cute charms on it along with pearls, rhinestones or anything else you want. 
I ordered my charms from Happy Kawaii Supplies on Etsy and I was really happy with it. You can order the clear case, the cream, charms, and anything else you would need.

Supplies You'll Need:

Clear phone case (or any color you want as long as it is a slim and minimal case)
Nail file or sandpaper
Puff paint
Pearls, rhinestones, micro beads, glitter or polymer clay sprinkles.
Piping cream (silicon cream, caulking or Mod Podge Collage Clay)
Icing bag and large star tip
Cabochons
Tweezers


The first step is to gather your supplies.


Then take your nail file and scratch up the top of the clear case so that the cream will stick to it a little better. Don't worry, you won't see it after you are done. Don't scratch up the sides of the case though. Now take out your cabochons and see what you want to use. I chose a sweets theme and purchased the large 25 piece assorted sweets pack so I had many options. I also got two large pink bows to use as the main focal point.


Arrange the pieces on the case approximately where you want them to go and take a photo with your phone so you can refer to it later. This is very important since you don't want to make a mistake and mess up your nice piping work.


Take your puff paint in whatever color you would like. I chose the Scribble Pop "Hot Chocolate" so it would look like chocolate sauce. You can do strawberry sauce, green ooze or even a blood color if you're into that. "Pastel Goth" is a thing, right?


Drizzle the puff paint onto the edges of the case to look like it's melting. You can purchase hot glue in various colors and do this with a hot glue gun if you want to. It hardens faster that way too! I chose puff paint and I like the results, but be careful not to touch it as it dries for a few hours. I added some rhinestones and polymer clay sprinkles around the camera area since I have to keep that part clear of the cream. 


These clay sprinkles were a great buy! It was a last minute addition to my cart and I'm glad I got it.


The only thing disappointing was that the light purple "simulation cream" I ordered was in too small of a tube to cover my entire phone case. Also the icing tips it came with were very small. I decided to use this for another project and went out to Michael's to pick up Mod Podge Collage Clay. It comes with enough cream for a ton of projects, comes with three large icing tips and you can get it in "Vanilla" (white)  or "Strawberry" (pink) and it only cost $9. I'm really happy this exists!!!!! Mod Podge had a whole new collection of products that I was happy to see too, including puff paints in brown, pink and red, and hot glue sticks in similar colors, I assume for projects just like this one.


Pipe the cream on your case and add your charms, sprinkles and everything else! Let it dry for a day or two before touching it.


I just love the little strawberry dipped pretzels! And the biscuits!! I should have ordered some more clear cases. I feel a collection coming on...


Saturday, June 7, 2014

Beginner Sewing - Baby Clothes


Back in 2009 when I lived in Guam I bought myself a really nice Brother XL2600i sewing machine. When I came back to the states to live in San Diego I had a bunch of my stuff shipped by boat, including the machine. Let's just say that Guam shipping stores don't have the same standards as a UPS here in the states, so it wasn't packed as well as I would have hoped. When it finally arrived there were some pieces broken off. I completely thought it was busted! It ended up in storage while I lived in Missouri and Alaska for four whole years. When I finally got it back it stayed in a closet until my mom got here. I don't know the first thing about fixing sewing machines so I had my her check it out for me. It turns out it was totally fine and works like normal! Sweet.

I used the tutorial for the knot baby hat below. I love it! I didn't use a tutorial for the leggings, which is why they came out a little wrinkled between the legs. I was hoping for a harem pant look, but I think I still need to work on it.

Upcycled Leggings - Useful if you already own a pair of baby leggings in the right size.

Baby Headband - I've been in love with these forever but I didn't want to pay $13 for just one little headband, especially considering how easy they are to make.

Top Knot Baby Hat - This pattern by Pretty Pruden is awesome!

Onesie Dress - From Smile and Wave. If I weren't saving those plain white onesies for the next baby I would have made a bunch of these!

Fitted Cloth Diaper - This looks like a pretty decent tutorial for a cloth diaper, but this is supposed to be only a liner. I wouldn't spend the time sewing a liner like this when I can just fold up a flat cloth diaper and put it into the cover. I think you could still use this idea for a diaper cover if you made the inner layer with waterproof fabric or with wool.

Toddler Yoga Pants - I'm in love with these!

I'm also in love with this:


Have fun sewing!

Wednesday, April 2, 2014

Crochet Veggies!

I practically gave myself carpal tunnel with all the crocheting I've been doing the last few days. I was inspired by Skunkboy Blog's planter but decided to crochet the vegetables instead of sewing them. After I started I couldn't stop! I'm almost running out of veggies! Last night I made a mushroom and I plan on making broccoli, cauliflower, habaneros, and a bok choy. I plan on getting a wooden bin to put all the veggies in and possibly making the "dirt" that they can be planted in like the tutorial. I don't know though, I may end up crocheting every food I can think of and just using it for the play kitchen I've been planning. 

I know, I know, I'm getting ahead of myself! Ellie isn't even born yet and she already has toddler toys! 


Here are the links to the patterns I used, though most of them I altered for one reason or another. The cabbage I just made up as I went along and the corn and eggplant are on the Lionbrand website that you have to register for to see, otherwise I would have linked them.
Beet, Radish, Carrots, Onion, Eggplant, Corn, Cabbage, Leek, and Bell Pepper.

Sunday, February 23, 2014

Grizzly Cross Stitch

A few weeks ago, out of nowhere, I decided I wanted to do a cross stitch. Usually this is something I would start and just give up on after a few days since it takes so long to finish... but this time I actually finished it! I bought the pattern from Mother Bee Designs on Craftsy. I suppose the fact that I spent a dollar on the pattern made me more motivated to finish the project. I have a TON of embroidery thread that was left to me by my grandmother and quite a bit that I bought myself, but I don't have many cross stitches to show for it. I also recovered a bunch of stuff from my storage unit in San Diego and found that I acquired quite a few craft supplies, including a bunch of empty picture frames. This one seemed to fit perfectly!

I'm pretty happy to have this cute grizzly bear to hang on the wall! 


Sunday, February 2, 2014

Easy DIY Furniture Update with Contact Paper


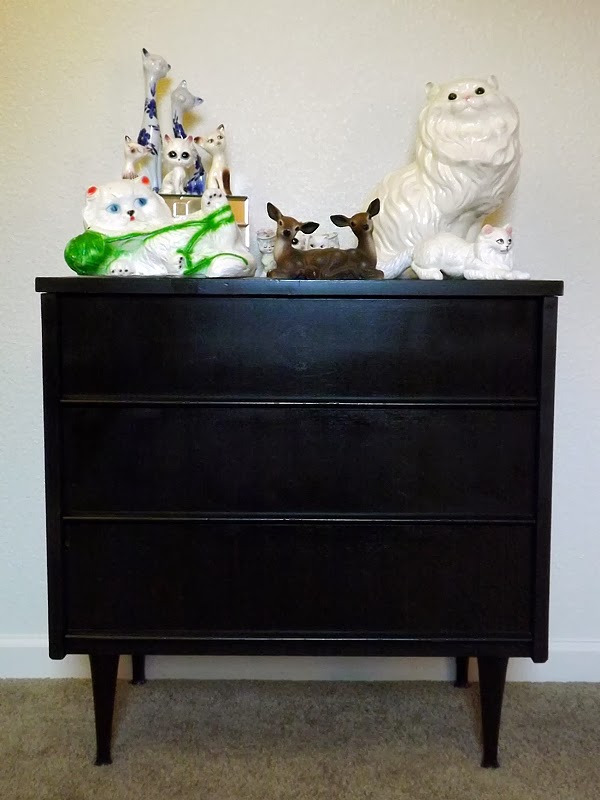
I have this awesome mid-century chest of drawers that I got back when I lived in San Diego. It was too beat up to leave it as it was so I used my favorite method of furniture updating, spray paint, to paint it black.


It worked fine but I still wish I could have saved some of that cool wood grain that looks so nice on mid-century furniture. Well, not saved, since it was an ugly shiny plastic woodgrain laminate before, but I wish it had it in the first place to save.


So what is my solution? Contact paper to the rescue! I've wanted to use this woodgrain contact paper since I saw it at the hardware store, but it's a little tricky to find just the right place to use it without being horribly tacky looking (although I guess the whole idea of it in the first place is that it's a little kitschy.) Plus, when I get tired of it I can just peel it off instead of repainting the whole thing. Sweet!


I measured out the shapes that I wanted on each drawer and cut them out carefully. Then I peeled off the backing and placed it on the drawers! Super easy! I think it makes the drawers look a little more interesting instead of just being a big black hunk of furniture sitting there. Try it!


Tuesday, January 28, 2014

DIY Dresser Makeover


I got a bedroom set from a friend when I first moved into our apartment that looked like this:


My friend must have had this set for a long time because I opened up one of the drawers and a baby picture of her fell out! 
Since we have moved I decided I really wanted to get Joe and I a new(ish) set and give this set a makeover for the nursery. There are so many decorating projects and things we have to get done in the new place that I find myself trying to do two things at once, or getting distracted while working on a project and starting on another. I actually painted this dresser green and then put it in Ellie's nursery a couple days ago. I was bringing the drawers for the second dresser out onto the patio and got half of them painted when I decided to bring the first dresser out and do a design on them with painters tape.


Are you getting tired of chevrons too? Yeah! Chevrons are probably taking over the internet! I LOVE my area rug though. It brings the attention away from the boring taupe walls. 
Even though chevrons have gotten a little overused I really think it still looks cute in a babies room. I used painters tape and eyeballed the spacing. I suppose you could measure each stripe if you want it to be exact, but I had no problem making it look even. 


I used an ivory color to go with the green. I felt afterward that the green I picked out was a little too "primary" and I wish I had picked a softer shade. I'm still happy with it though! It will transition well from a nursery to a kids room. I peeled the painters tape off while it was still a little wet and it worked out just fine.


After they were dry I screwed on the new silver handles I picked to replace the gold ones. You have no idea how much I wanted to purchase these adorable handles that were shaped like branches, but $15 a handle is just a little too much for a babies room!


Saturday, January 25, 2014

DIY Kitty Tower - Kitty's 13th Birthday!


Mrs. Peacock turned 13 a few days ago! What an old lady! Since we got a much bigger place to live I thought it would be nice to give her a little spot to hang out and look down on the lowly humans. It would also be a great place for her to feel safe away from a dog, whenever we get one. 

We purchased a couple of floating shelves from Lowes because they looked nice and were wide enough for Kitty to be comfortable. Make sure you look at how much weight the shelves you buy can hold, since you wouldn't want your kitty to fall down. Mrs. Peacock is only 6 pounds and these shelves can hold 12 pounds, so I think they will work out just fine. 


Make sure you put the shelves where there is at least one wall stud to support it. We used drywall brackets for the side that couldn't be drilled into a stud.  

Do a staggered set up so kitty can jump easily to each level! We put two above her kitty tower so she can get pretty high up and one behind the couch because she loves to sit with us.

It's really important that you put something they can dig their claws into so they don't slide off. I used a double thickness of black felt for the tops. My kitty loves fleece but I didn't have any to make pillows out of for her. A good idea is also to use scraps of carpet for scratching or an old bath mat.


Happy Birthday Mrs. Peacock!

Thursday, January 16, 2014

DIY Inspiration Links

I've been so anxious to start getting our home together but there is nothing I can do until we get our house and furniture. This means I've been spending a LOT of time on Pinterest and Google maps, seeing how far away Babies R Us and Ikea are from us. Turns out it will be a good three hour trip to Texas if we want to shop in-store! I think it still beats paying for shipping, but it looks like shopping will take up quite a bit of time.

Here are some pretty sweet links I found:

I've got some jeggings that have a broken button and I think I might use them to make these DIY Maternity Jeans.

This Painted Dresser Inspiration is some of the best painting jobs I've seen on dressers!

27 DIY Ways to Hide the Litter Box led me to a website I feel like a FAILURE for not knowing about before, Ikea Hackers. This FAKTUM Kitty Loo looks easy to customize!

Speaking of home improvements for Mrs. Peacock, I've been thinking of installing kitty shelves so she can have a place up high to hang out. Since we are going to get a dog soon I think she would be pretty happy having a safe place to hang out where the dog won't be able to reach her.

Not only am I thinking about giving her a sweet kitty play space and a hidden litter box, but her bad breath is just about driving me crazy! I really want to improve her diet. Poor kitty had really bad teeth when we got her and the vet wanted over a thousand dollars to clean them. There is just no way we could ever afford that, so I checked out feeding cats a raw diet with a supplement from Felines Pride. The thought of getting a meat grinder is a little ridiculous since we eat a pescatarian diet ourselves, but I think I can use my food processor just as easily. I hope it can improve her teeth, poor baby!

Sunday, November 17, 2013

Dresser Set Makeover - The Planning Stage

Wow guys, November is really moving fast! This is a big month for us, getting all our stuff together for the big Road Trip across Canada and the U.S. This coming week I have to continue with a bunch of paperwork, driving all around gathering signatures. This Saturday is the baby shower. We have to organize all our stuff into "bringing with us in the car" and "packing up with the movers." The car needs to be spacious enough so when we leave it parked in a city like San Francisco it won't get broken into, but we also need the essentials like clothes, toiletries, food for the cooler, emergency stuff in case we get stuck in a snowstorm, and stuff to keep the kitty comfortable. We also have to get kitty her papers and a checkup to go over the border. Of course my job is making things more difficult by just now telling me that I NEED a government passport. As if I could get one in less than a week. This is all BS of course. But whatever. The date I leave is the date I leave and they can't stop it!

What I am really excited about lately is the new house we will be getting in Louisiana! I keep looking at the floor plans they have and wondering which one we will get. When we moved into the apartment we have now I didn't have any furniture at all. I actually got everything from my friend who was getting rid of her bedroom set and wanted to get rid of an old love seat too. So that is what we have now, two bed side tables for a TV stand in the living room, a loveseat for the both of us to sit on, a dresser in the living room to hold my military uniforms and sewing stuff and another dresser in the bedroom for clothes. I'm hoping that Joe and I can get a whole new bedroom set once we get to the new place... It might take a while since I really want to find eclectic things from flea markets and thrift stores. I have a storage unit in California with some nice things in it that can start us off, but it won't be enough for both of us.

The main point here is that I want to use our current bedroom set for the nursery. I'm willing to live out of a suitcase while we look for a nice dresser, as long as the nursery is perfect! The problem, of course, is that the bedroom set we have is a little old. It seriously needs a makeover! Good thing I LOVE this kind of stuff!

I have been sitting here looking at these dressers for months now, wondering what I can do with them. The bare bones of the furniture is like, a mid nineties style I think. It's not modern, it's not traditional or transitional. I can't really tell what it is except that it has gold trim (yuk!) New drawer pulls is the first thing that comes to mind. I also want to pull off the gold trim and replace it or find a way to paint over it. Spray paint is a miracle, by the way! I also want to see how easy it would be to put the dressers on little feet instead of just being flat on the ground.


But what about the inspiration? I've been searching for some ideas and here are a few that look feasible with the design of my current pieces. It's a shame how many photos you see on pinterest of perfectly awesome looking furniture, mid century modern style, that are then destroyed with weird paint jobs! I swear half the "makeover" pins I looked at had the "before" peice looking much better than the "after."

IMG_0035

Mid-Century Dresser from Dream Green DIY. Weird paint job, yes, but it actually looks really cool combined with the wood stain she used. 


Ikea Dresser Makeover from The DIY Homegirl. This paint job is simple and still looks retro!


Ikea Tarva Hack from Persia Lou. She was inspired also by the mid century dresser I posted above. Again, I love the idea of incorporating wood grain in the design. 

I'm trying to refrain from taking a trip to Home Depot! I don't think it would be a good idea to start up a big project like this right before a big move, but hopefully I can get it done once we finally get settled into our new place.

Thursday, August 1, 2013

Big Eye Custom Portrait

The past few days I have spent painting a copy of a Margaret Keane painting, called "Little Ones." It all started because I found a print of a Margaret Keane in a thrift shop. It was $25 and I wasn't in love with the picture, so I passed it up. Of course, that was a stupid decision! It wasn't an original or anything, just a poster, but I still regret not getting it. I went back, crossing my fingers that it was still there, but of course it was gone.
Then it occurred to me that I didn't need to buy one when it would be a lot more fun just to paint one myself. That way I could have any picture I wanted! I also could customize it to have a special meaning.

If you don't know Margaret Keane, she is the artist who inspired Blythe dolls in the 60's and 70's, Tim Burton, and a large portion of the modern lowbrow art movement. It's now known as "Big Eye" art. Her story is interesting so check her out at the link above!

I picked out "Little Ones" to copy because I wanted to replace the Siamese kitty with Mrs. Peacock. I think she turned out extra cute!


keane, big eye art, kitty, kitsch


keane, big eye art, kitty, kitsch

keane, big eye art, kitty, kitsch

If you want to practice painting or if you want to learn but don't know how to start, this might be a good way to do it. Copying isn't a bad thing unless you try to sell it or claim that you came up with the idea yourself (even Roy Lichtenstien copied comic books.) Art classes sometimes go to museums and sit students in front of paintings which they then copy, stroke for stroke. 
For me, I hate trying to figure out proportions and light. Light confuses me so much... I can't just "imagine" where light will fall on something. I need to see it. Also I get tired of drawing a redrawing just to keep saying to myself, "The eye looks sideways and the head is too small... or too big?" So to keep from wasting a whole day trying to sketch something I did the grid method:


I drew 2"x2" grid squares on my canvas lightly in pencil . On the computer I made the picture I wanted to copy the same size as my canvas and drew guides every two inches. Then using the grid as a guide I sketched my drawing onto my canvas.
I changed things up a bit by making the child look more like myself, with green eyes and brown wavy hair, and obviously I added my own kitty, Mrs. Peacock. At the end I put a flower crown on the girl because I thought her head looked like a big mass of hair and I wanted to break it up a little.

Remember that if you use the grid it doesn't make painting itself any easier. If you look closely at the details you can tell that I have no clue how to paint a daisy. I'm no expert, so parts of this painting were tough and a few times I thought I hated it, but I kept going at it and over-painting until I was happy (or at least until I said "f**k it, I'm done!")

If you really can't paint at all but still want to try painting something fancy for yourself, try copying Mark Rothko or Piet Mondrian. I promise you won't mess it up!

keane, big eye art, kitty, kitsch

Sunday, April 28, 2013

Dia De Muertos Hoodie

I'm so happy I finished up this hoodie! I am excited to start on Joe's bear print hoodie next. It's too bad that the hoodie material is so expensive because I have so many ideas for more. I would love to make one with a lace back for summer. I can probably find some used fabric at a thrift store an make another one fairly cheap.
I really love the heart shaped elbow patches - I cut out a Catrina for one elbow and a sugar skull for the other. The green zipper is a nice detail too.

McCalls 6614


McCalls 6614


McCalls 6614

The pups in the background was sitting happily on a snow pile, haha!


I used the lining fabric for the inside of the pockets too.


If you like what you just read please click to send a quick vote for me on Top Mommy Blogs- The best mommy blog directory featuring top mom bloggers Related Posts Plugin for WordPress, Blogger...